The topic of today’s post will be the first styling of an Alaskan yellow-cedar, Chamaecyparis nootkatensis, aka “Nootka Cypress”. The material was sourced from Elandan Gardens in Bremerton, Washington. I belong to the Bonsai Society of Portland and have been the first vice president of programs for the past two years and as such, I invited Dan Robinson, owner and proprietor of Elandan Gardens to Portland in October to give us a program working with species native to the Northwest. As a bonus to the program, Dan brought several trees with him that were for sale at very reasonable prices and had a lot of ‘gnarliness’ to them 😉 He brought some engelman spruce, larch and quite a few of these yellow cedars. I really fell in love with them and had very little competition from my fellow members because they just couldn’t get past that foliage…
It’s true that these cedars have long, droopy foliage that doesn’t look very attractive on first blush. But that’s what wire is for! I could see beyond the obvious and what I saw were these incredible trunks that had been buried most of their lives in a peat bog. The conditions present rotted away the trunks in such a manner they looked as though they had been skillfully carved. I was not too flush the night of the program, but I convinced a friend she just had to have one of these and I would help her with the styling. Before I go any further, how about a photo of what we’re talking about?

That photo was taken one of the last sunny days we had here–around November sometime. You can see the planted angle as it was received was nearly horizontal and I had to keep that rock around everywhere I went with this tree because it kept flopping over. So, at this point, the foliage appears as it naturally does with this species–droopy, soft and fern-like. I really quite like it this way, but as I said before, I was intrigued to see if I could transform it with wire into something more like what we are accustomed to seeing as a bonsai. Some other shots late last week as I had it set up for a new styling angle:

I tipped the tree up on its axis (got it out of bed, so to speak) for a more dynamic feeling and also to show off the hollow feature of this amazing old trunk.

Another view, further away.

Over to the left.

Closer.

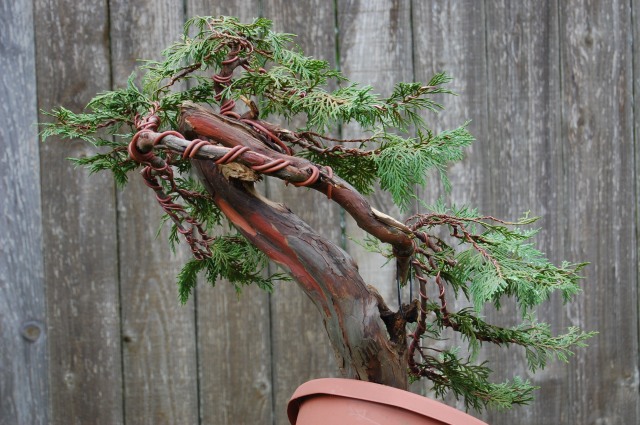
The left side.

Moving counter-clockwise toward the back of the tree. Notice the stub of a large branch that was cut off before I received the tree…this will have to go!

Moving ever-so-slightly towards the back. You can see why some thought the foliage was never going to be useful for a bonsai…

And the back of the tree; notice the length of that branch stub and how it prevents the live branch above it from being brought down. This is where I started the styling of this tree–silk carving that stub away until the branch above could be brought down with two #6 copper wires and a guy wire. These cedars are tough trees and can take a lot of bending but care must be taken as the bark is thin and can easily be marred.

Almost around to what I decided for the front. I guess the secret’s out about how much this tree cost 😉

And here is a
shot of the front, before styling. You can see the hollow area near the top. It was full of rotting vegetation among other things, but the live area around the back of the tree was very much intact and once I cleaned the hollow area out with a steel brush, one could see the lovely grain of the wood and appreciate the hollow feature better. If this were my tree I would only apply a very dilute mixture of lime sulfur to the hollow cavity as well as mix some india ink or other black pigment in with it. I really like to see a hollow trunk be dark inside–it adds to the mystery and beckons the viewer to come closer and inspect what’s inside.
Before I unveil the final image, I have to say that while progression shots are educational and interesting, I was unable to take any good ones as it was pouring rain the whole time I was working on the tree and I really don’t have a dedicated area indoors for photography yet. Coming soon though, I promise! So, here is the tree as it looked yesterday, after one and one half days of work:

Let’s take a little tour around the tree:

Notice the beautiful color of the bark once the old flaky pieces are removed. I’ll bet this would look really sexy oiled up for a show 😉
This looking at the back but moving toward the left side of the tree. Note the carved stub and how the branch that was above it was brought down to make the the lower left branch from the front.

A shot from the left side of the tree.

Detail of the hollow section near the top of the tree. I quite like the natural color of the wood and would have to think hard about covering this up with anything. It will oxidize naturally on its own and the cedar wood is impregnated with resin that has allowed it to remain laying in a bog for how long??

Detail shot of the trunk base showing the natural hollow of the tree. Gorgeous trunk!
I thought I’d leave you with a little eye candy for the holidays; I planted this violet in an iron nut I found alongside the railroad tracks near where I live. Railroad tracks are a great source for rusty bits of iron to plant stuff in 😉

Can you believe violets are blooming in mid-December? Very odd…Happy Holidays dear reader!!


